
 Pin it
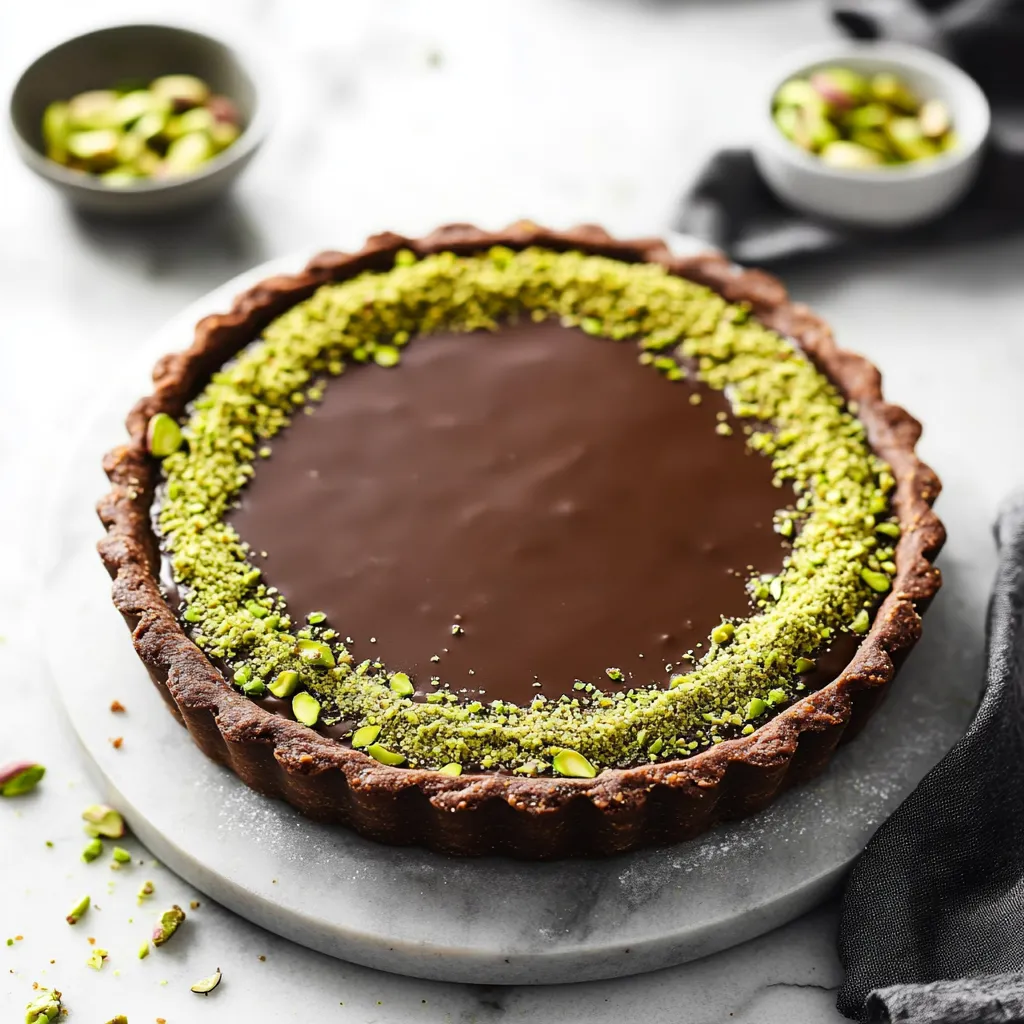
This decadent no-bake chocolate tart with pistachio paste has transformed my dessert game, offering an impressive showstopper that requires zero oven time. The combination of rich chocolate ganache layered over vibrant pistachio paste creates a dessert that's as visually stunning as it is delicious.
I first created this tart for a summer dinner party when it was too hot to turn on the oven. The guests were so impressed they thought it came from a high-end bakery and now it's my signature dessert for special occasions.
Ingredients
- Crust: Pecans or hazelnuts provide a nutty base that complements the chocolate perfectly
- Cacao powder: Adds intense chocolate flavor without added sugar
- Sea salt: Enhances all the flavors and balances sweetness
- Pure maple syrup: Binds everything together while adding natural sweetness
- Pistachio Paste: Raw pistachios create the smoothest texture when soaked properly
- Maple syrup: Adds just enough sweetness without overpowering the pistachio flavor
- Vanilla bean paste: Introduces warm aromatic notes
- Matcha powder: Optional but enhances the natural green color beautifully
- Chocolate Ganache: Full-fat coconut milk creates a silky smooth ganache that sets perfectly
- High-quality dark chocolate: Provides deep rich flavor
- Maple syrup: Balances the bitterness of dark chocolate
- Sea salt: Amplifies the chocolate notes and creates dimension
Step-by-Step Instructions
- Prepare the Pistachios:
- Soak shelled pistachios in water for 4 hours or speed up the process with a 30-60 minute soak in hot water. This crucial step softens the nuts and loosens the skins for the smoothest paste possible. Rinse thoroughly and remove as many skins as you can by gently rubbing between your fingers. The more skins you remove, the more vibrant green your paste will be.
- Create the Crust Base:
- Process the nuts, cacao and salt together until they reach a fine sandy texture. Pour in the maple syrup gradually while the processor runs until the mixture holds together when pressed between your fingers. This texture is critical for a crust that slices cleanly without crumbling. Press the mixture firmly into your lined tart tin, using the back of a spoon to create even thickness along the bottom and sides.
- Chill the Base:
- Place the formed crust in the freezer for a full 30 minutes. This step is non-negotiable as it ensures the crust maintains its structure when you add the wet layers. A properly chilled crust will have a slight sheen and feel solid to the touch.
- Create Pistachio Paste:
- Blend the soaked pistachios with maple syrup, vanilla, and optional matcha until completely smooth. This process takes patience, usually 5-10 minutes of blending with frequent breaks to scrape down the sides. The finished paste should have the consistency of natural peanut butter with no grittiness when rubbed between your fingers.
- Assemble the Layers:
- Spread the pistachio paste in an even layer over the chilled crust using an offset spatula. Work from the center outward, creating a smooth, level surface. Return to the refrigerator to firm up while preparing the ganache.
- Prepare the Ganache:
- Heat coconut milk just until small bubbles form around the edges, being careful not to boil. Pour over finely chopped chocolate and allow to sit undisturbed for 5 minutes before stirring. This patient approach ensures the smoothest possible ganache. If any chocolate pieces remain unmelted, place over a double boiler and stir gently until completely smooth.
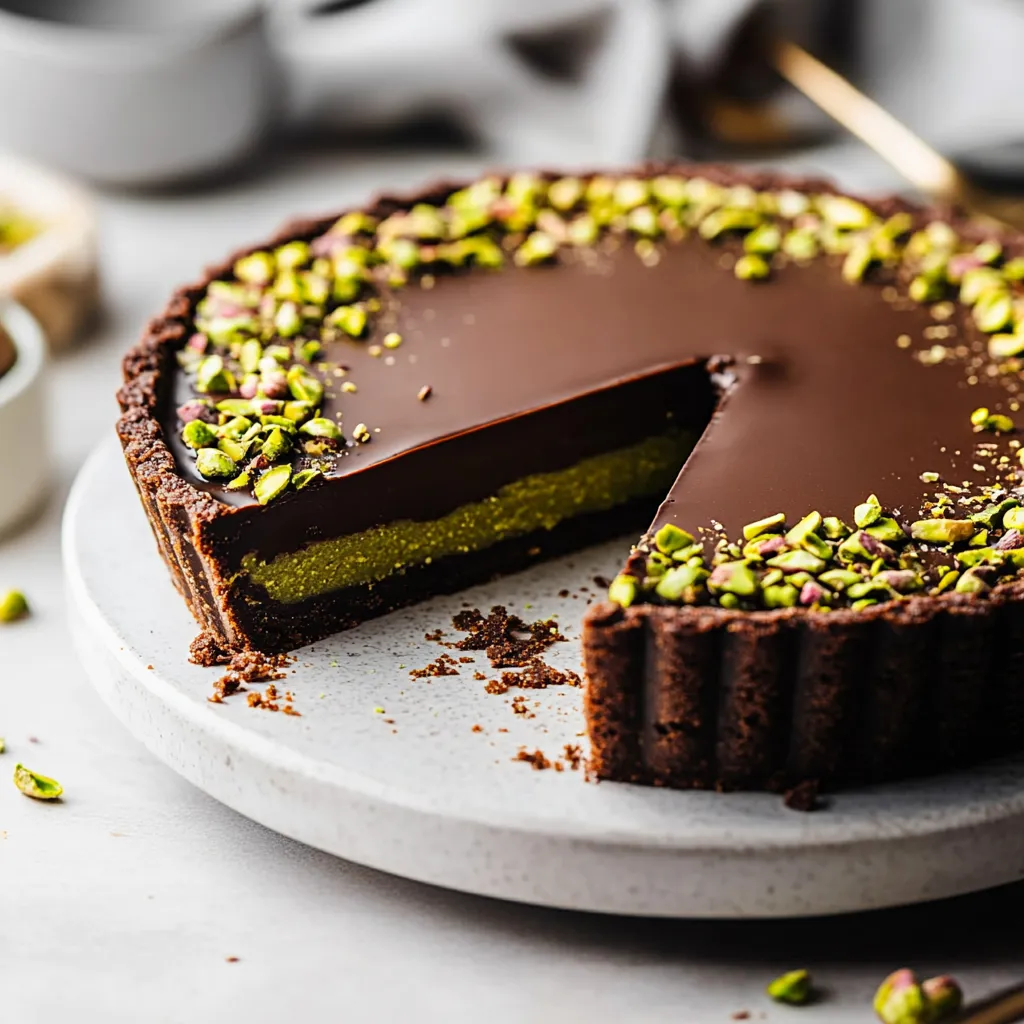
- Final Assembly and Setting:
- Pour the ganache over the pistachio layer, gently tapping the tart on the counter to release air bubbles and create a perfectly smooth top. Refrigerate for at least 4 hours, though overnight yields the best texture and flavor development. The finished tart should have a slight sheen and feel firm to the touch.
 Pin it
The pistachio paste is truly the heart of this dessert. I discovered its magic while traveling through Sicily, where pistachio cream is treasured. Creating it from scratch rather than using store-bought makes an extraordinary difference in both color and flavor.
Perfecting the Pistachio Paste
The secret to truly exceptional pistachio paste lies in removing as many skins as possible. After soaking, I gently rub the pistachios between clean kitchen towels to remove stubborn skins. For the most vibrant green color, use the freshest pistachios you can find, preferably ones that haven't been roasted. The natural oils in pistachios create a creamy consistency when processed long enough, so resist the urge to add extra liquid unless absolutely necessary.
Make It Your Own
This versatile tart welcomes creative variations. Replace pistachios with hazelnuts for a Nutella-inspired flavor. Add a tablespoon of espresso powder to the ganache for a mocha variation. For special occasions, I sometimes add a layer of raspberry coulis between the pistachio and chocolate layers, which introduces a wonderful tartness that balances the richness. You can also simplify by skipping the pistachio layer entirely for a classic chocolate tart.
Troubleshooting Tips
If your ganache appears broken or grainy, warm it gently while whisking vigorously. Too much heat can cause separation, so work with patience. For a crust that seems too dry, add maple syrup one teaspoon at a time until it holds together. If the pistachio paste feels too thick to spread, incorporate a few drops of coconut oil to achieve the ideal consistency. Each ingredient has its own moisture content, so small adjustments may be necessary.
 Pin it
This no-bake chocolate tart has become my secret weapon for entertaining, allowing me to prepare an impressive dessert days ahead while focusing on other dishes the day of serving. The combination of textures and flavors creates a memorable ending to any meal, sophisticated enough for special occasions yet simple enough to enjoy whenever chocolate cravings strike.
Frequently Asked Questions
- → Can I use different nuts for the crust?
Yes! While the recipe suggests pecans as the primary option, you can substitute with hazelnuts, walnuts, or cashews for the crust with excellent results. Each nut will provide a slightly different flavor profile to complement the chocolate.
- → Why do I need to soak the pistachios?
Soaking pistachios serves two important purposes: it softens them for easier blending into a smooth paste, and it helps loosen the skins so they can be removed easily. This results in a smoother, creamier pistachio paste with better color and texture.
- → Is matcha powder necessary for the pistachio paste?
The matcha powder is optional and primarily used to enhance the green color of the pistachio paste. The tart will taste just as delicious without it, though it may have a slightly less vibrant green appearance.
- → Can I make this dessert ahead of time?
Absolutely! This is an excellent make-ahead dessert. It can be refrigerated for up to 5 days or frozen for up to 3 months. If frozen, simply defrost in the refrigerator overnight before serving.
- → What's the best way to slice this tart cleanly?
For clean slices, dip a sharp knife in hot water and wipe dry between each cut. The heat helps the knife glide through the ganache layer without dragging or cracking the surface.
- → Can I substitute the maple syrup with another sweetener?
Yes, agave syrup works as a direct substitute as mentioned in the recipe. Honey could also work if you're not making a vegan version. Liquid sweeteners work best to maintain the right consistency in all layers.