
 Pin it
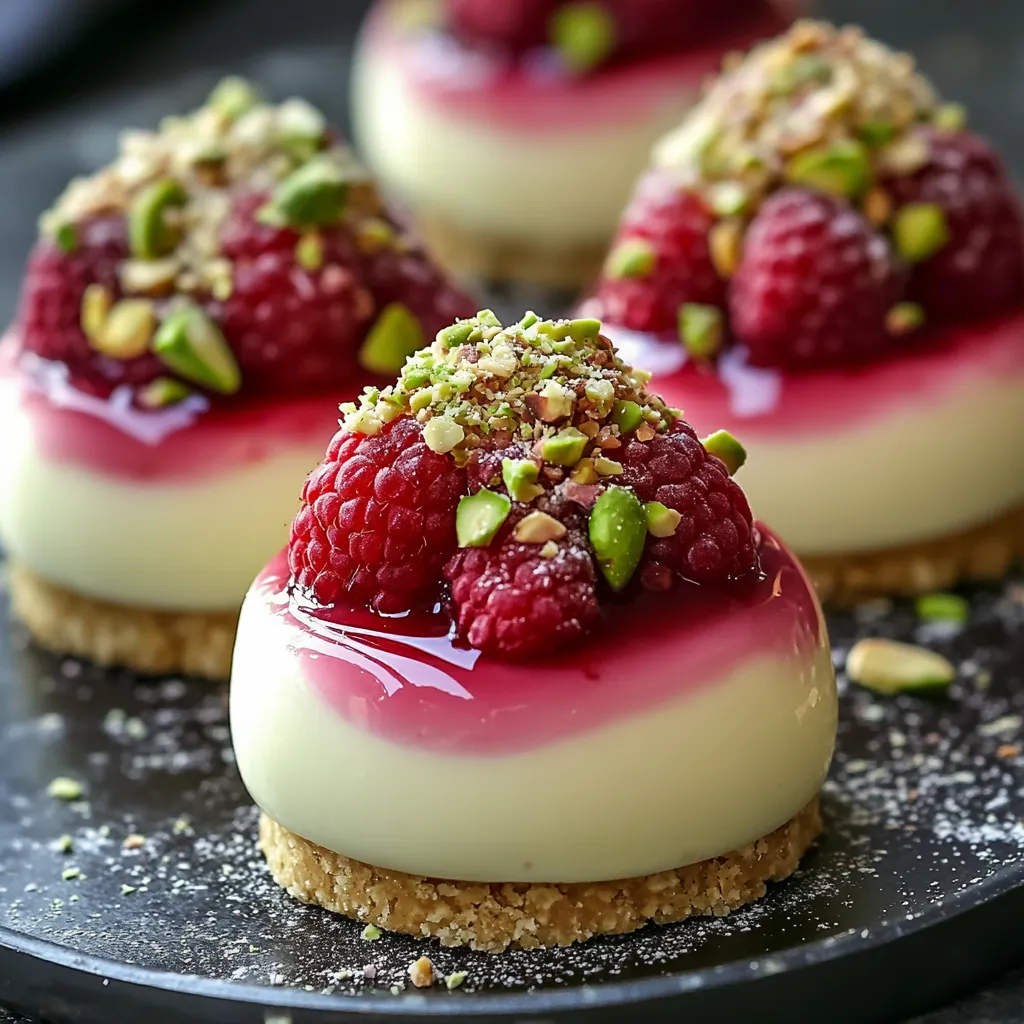
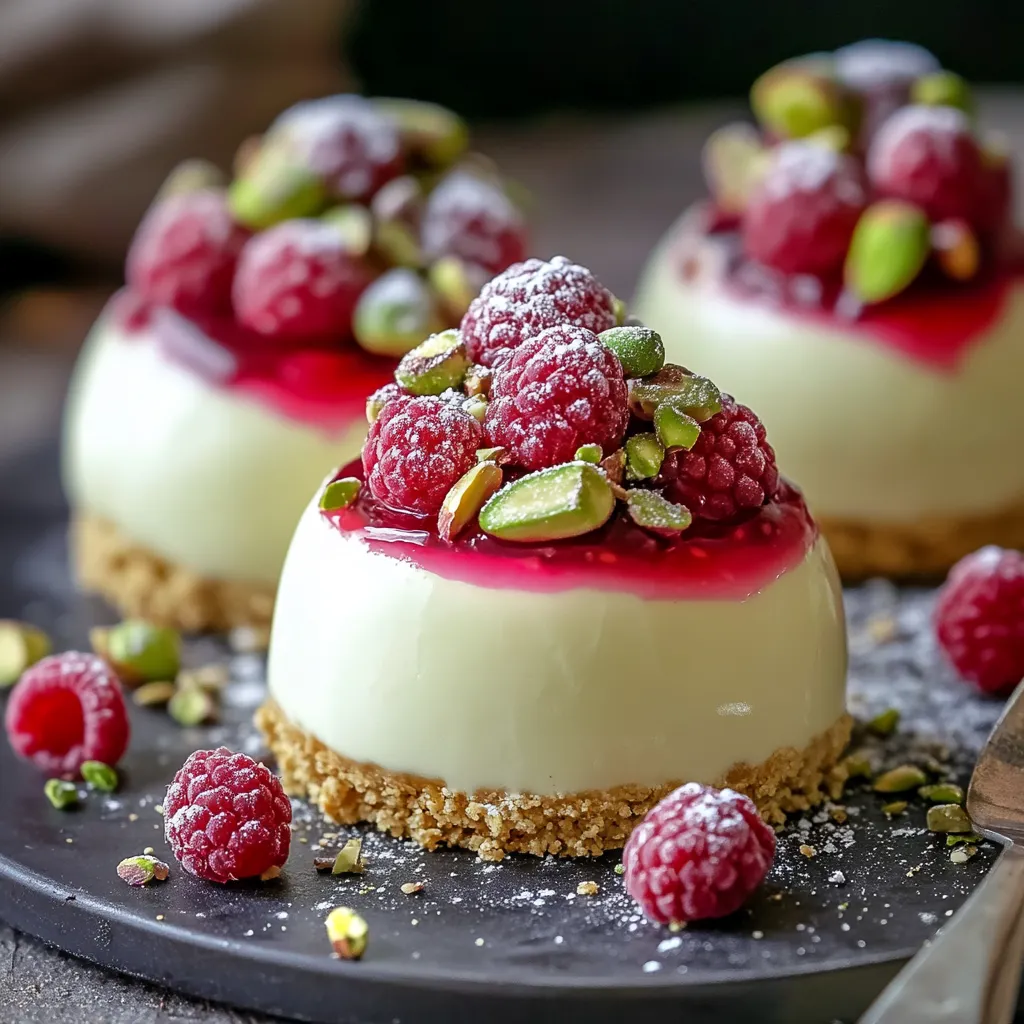
Pistachio and raspberry create a magical flavor combination that transforms an ordinary cheesecake into something extraordinary. These no-bake cheesecake domes offer the perfect balance of creamy, nutty, and fruity flavors in individual servings that look as spectacular as they taste. The vibrant green pistachios and ruby red raspberries create a stunning visual contrast while delivering complementary flavors that dance on your palate with each bite. The silky smooth texture of the filling paired with the crunchy base provides a delightful textural experience that makes each mouthful a moment to savor and enjoy.
I remember making these for my sister's birthday gathering last summer when the temperature was too high to even think about turning on the oven. Everyone was absolutely mesmerized by both the presentation and flavor, immediately asking for the recipe before they'd even finished their portions. The look of pure delight on their faces as they took their first bite made all the preparation worthwhile, and I've been perfecting the recipe ever since.
Ingredient Selection Guide
- Unsalted pistachios (100g): These provide the distinctive nutty flavor that makes this dessert unique. Look for bright green kernels without any yellowing which indicates freshness. Turkish or California pistachios work equally well, though Turkish tend to have a more vibrant color.
- Digestive biscuits or graham crackers (100g): These create the perfect base texture while complementing the pistachios. Select plain varieties without added flavors that might compete with the star ingredients.
- Unsalted butter (60g): Acts as the binding agent for the crust. Quality butter with high fat content creates better structure and flavor. European-style butter with its higher butterfat percentage gives an even richer result if available.
- Cream cheese (250g): The foundation of the filling. Always choose full-fat versions at room temperature for the smoothest results without lumps.
- Heavy cream (120ml): Provides the luxurious mouthfeel we love in cheesecake. Look for cream with at least 35% fat content for proper whipping and stability.
- Powdered sugar (60g): Dissolves seamlessly into the filling. Sift before using to eliminate any lumps for the silkiest texture.
- Vanilla extract (1 tsp): Enhances all other flavors without overwhelming them. Pure extract rather than imitation gives superior results.
- Lemon juice (1 tbsp): This optional ingredient adds brightness that balances the richness of the cream cheese.
- Fresh raspberries (100g): Their tartness balances the rich cheesecake perfectly. Choose plump, fragrant berries without any signs of mold or mushiness.
- Honey or sugar (1 tbsp): Adds sweetness to the raspberry topping if needed. Local wildflower honey pairs beautifully with the berries.
Building The Perfect Base
- Prepare Your Equipment
- Select your dome molds, ensuring they're clean and dry. Silicone molds work exceptionally well as they allow for easy removal.
- Combine Ingredients
- In your food processor, blend the pistachios and digestive biscuits until they form fine crumbs resembling sand. This consistent texture ensures your crust will hold together beautifully when sliced.
- Add The Binding Agent
- Pour in your melted butter and pulse several times until every crumb is moistened. The mixture should hold together when pressed between your fingers but still maintain a slightly loose texture.
- Press With Purpose
- Transfer your crust mixture into your dome molds or cupcake liners, using firm pressure to create a compact base.
- Chill Properly
- Place your prepared crusts in the refrigerator for at least 30 minutes before adding your filling.
 Pin it
Pistachios have always been my favorite nut to incorporate into desserts. Their subtle sweetness and beautiful color transform ordinary recipes into something special. My grandfather was particularly fond of them, claiming they helped keep his heart healthy while satisfying his sweet tooth.
Creating The Silky Filling
Ensure all ingredients are at proper temperature. Cold cream cheese leads to lumps, while cream whips best when cold. Beat cream cheese with powdered sugar until smooth. Add vanilla extract and optional lemon juice. In a separate bowl, whip heavy cream just until soft peaks form, then gently fold it into the cream cheese mixture.
Assembly Techniques
Carefully spoon filling over each chilled crust, leaving space for the raspberry topping. Smooth the tops using an offset spatula. Cover molds with plastic wrap and refrigerate for at least three hours or preferably overnight.
 Pin it
The Perfect Topping
Just before serving, mash raspberries with honey or sugar. Spoon over the domes, letting some drip naturally for a stunning effect.
Frequently Asked Questions
- → Can I make these cheesecake domes ahead of time?
- Absolutely! These domes are perfect for making ahead. They can be fully assembled and stored in the freezer for up to two weeks. Simply transfer them to the refrigerator about 2 hours before serving to allow them to thaw to the perfect creamy consistency.
- → What if I don't have half-sphere silicone molds?
- If you don't have half-sphere molds, you can use a standard muffin tin lined with plastic wrap as an alternative. The shape won't be perfectly domed, but the dessert will still taste delicious. Another option is to make this as a single cheesecake in a springform pan, layering the raspberry filling in the middle.
- → Where can I find pistachio paste?
- Pistachio paste can be found at specialty baking stores, gourmet food shops, or online retailers. If you can't find it, you can make your own by finely grinding shelled, unsalted pistachios in a food processor until they release their oils and form a smooth paste. Add a touch of neutral oil if needed to achieve the right consistency.
- → Can I use other fruits instead of raspberries?
- Yes, you can substitute the raspberries with strawberries, blackberries, or even a fruit compote made from peaches or mangoes. Just make sure whatever fruit you use is properly thickened with cornstarch so it doesn't make the mousse too watery when it thaws.
- → Why is my cheesecake mousse not setting properly?
- If your mousse isn't setting firmly enough, there are a few possible causes. Make sure your cream is whipped to soft peaks before folding it in, and that your cream cheese is full-fat. If you live in a warm climate or want a more stable structure, definitely use the gelatin mentioned in the optional ingredients.
- → How long should I let the domes thaw before serving?
- For the best texture and flavor, remove the domes from the freezer and place them in the refrigerator about 2 hours before serving. Then let them sit at room temperature for the final 15-20 minutes. This gradual thawing ensures the perfect creamy consistency without becoming too soft to hold their shape.