
 Pin it
Crispy golden chicken with a tender, juicy interior is what makes chicken katsu an unforgettable meal. This Japanese comfort food transforms ordinary chicken breasts into something extraordinary through a simple yet precise coating process. The contrast between the crunchy exterior and the succulent meat inside creates a texture sensation that keeps everyone coming back for seconds. My family requests this dish at least twice a month, and I've perfected my technique over countless preparations.
The first time I made chicken katsu, I was skeptical about achieving that perfect crunch at home. After experimenting with different breadcrumbs and frying techniques, I discovered that authentic panko makes all the difference. Now my version rivals what we've enjoyed at our favorite Japanese restaurants, and costs a fraction of the price.
Incredible Ingredients
- Chicken breasts: Select plump, even-sized chicken breasts for uniform cooking. The quality of your chicken makes a significant difference in the final dish.
- Panko breadcrumbs: Create a delicate, crispy coating that stays light rather than dense.
- All-purpose flour: Forms the foundation layer for an even coating. Sifting ensures smooth application.
- Fresh eggs: Bind the coating layers for a sturdy crust. Room temperature eggs create better adhesion.
- Vegetable oil: Choose a neutral oil with a high smoke point for frying.
- Salt and pepper: Enhance the natural flavor of the chicken.
Preparation Process
- Flatten chicken:
- Place each chicken breast between plastic wrap and pound to half-inch thickness for even cooking.
- Season thoroughly:
- Season both sides with salt and pepper, letting it rest for 10 minutes.
- Create stations:
- Set up three dishes: flour seasoned with salt and pepper, beaten eggs, and panko breadcrumbs.
- Coat carefully:
- Coat chicken in flour, then dip into beaten egg, followed by pressing into panko breadcrumbs.
- Fry perfectly:
- Heat oil to 350°F. Fry chicken for 4 minutes per side until golden brown and cooked through.
- Rest properly:
- Transfer to a wire rack and let rest for 5 minutes before slicing.
 Pin it
My grandmother always said the secret to perfect katsu was in the breadcrumbs. When I visited her in Osaka, she showed me how to press the panko gently into the chicken rather than tossing or shaking. This creates that distinctive craggy texture that captures sauce so beautifully.
Delicious Companions
Chicken katsu pairs wonderfully with traditional sides like steamed Japanese rice and finely shredded cabbage with sesame dressing. For a heartier meal, transform it into katsu curry by serving with rich Japanese curry sauce.
Creative Changes
Try pork loin for authentic tonkatsu or firm tofu for a vegetarian option. Add curry powder to your flour coating or grated parmesan to your panko mixture. For a healthier version, air fry at 375°F for 15 minutes.
Freshness Tips
Store leftovers in airtight containers with paper towels between layers. Reheat in a 350°F oven for 10 minutes for best results.
 Pin it
My journey with chicken katsu began after a memorable trip to Japan where I watched a master chef prepare it with such precision. His patience taught me that attention to detail—from the proper breading technique to precise frying—makes all the difference.
Frequently Asked Questions
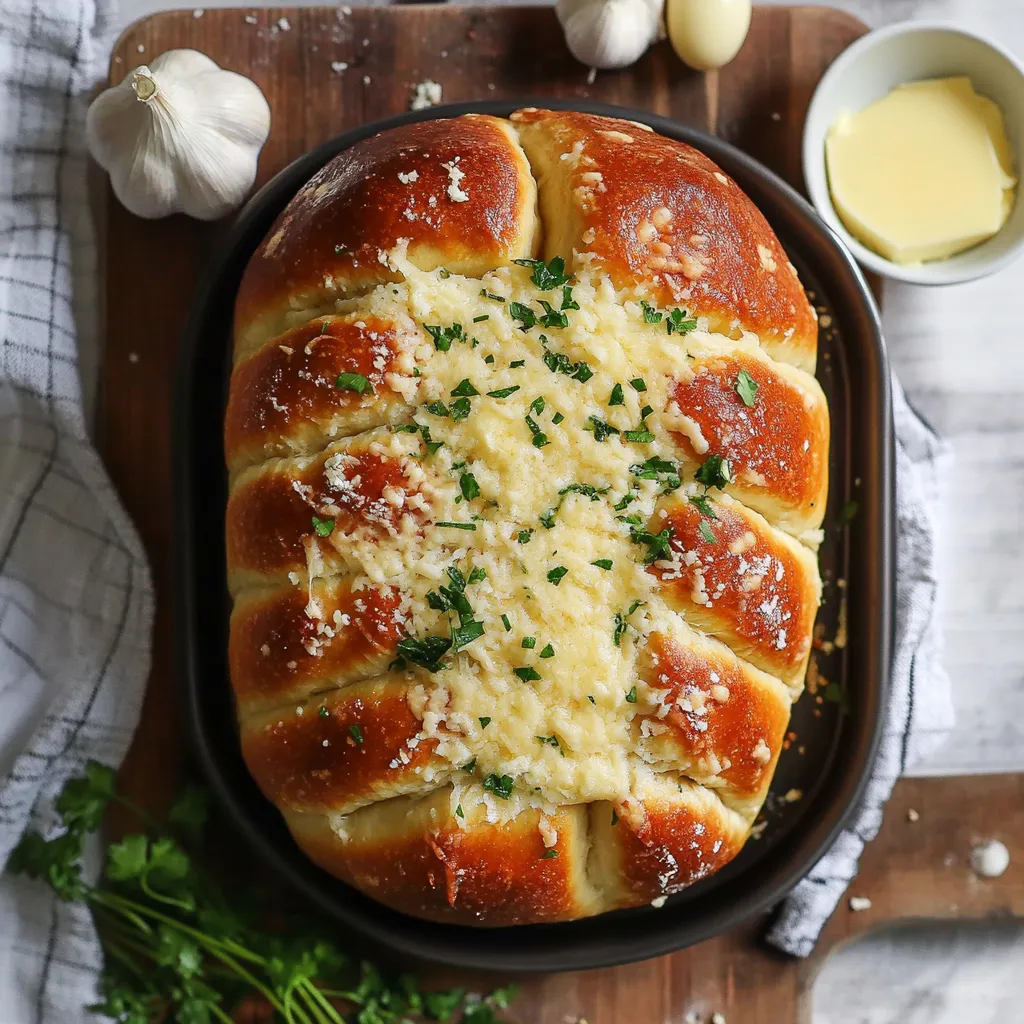
- → What is tangzhong and why is it used in this recipe?
- Tangzhong is a Japanese bread-making technique where a small portion of flour and milk is cooked into a paste before being added to the dough. It helps trap moisture in the bread, resulting in an exceptionally soft texture that stays fresh longer without preservatives.
- → Can I make the dough without a stand mixer?
- Yes, you can knead the dough by hand, though it will require about 20-25 minutes of vigorous kneading to develop the gluten properly. The dough is ready when it becomes smooth, elastic, and passes the 'windowpane test' where you can stretch a small piece thin enough to see light through it.
- → Can I prepare any parts of this bread ahead of time?
- The roasted garlic butter can be prepared up to 3 days ahead and refrigerated. Just bring it to room temperature before spreading. You can also prepare the dough through the first rise, then refrigerate it overnight. Let it come to room temperature before shaping.
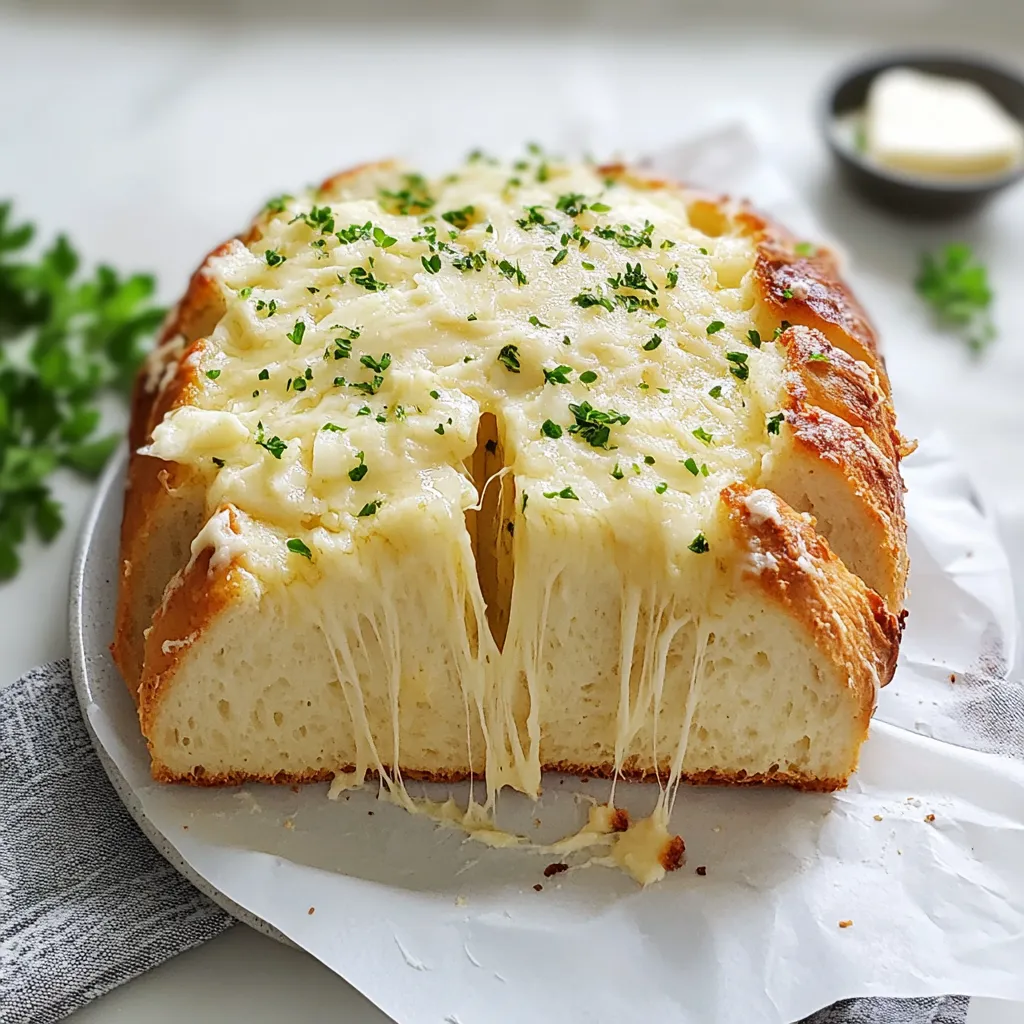
- → What other cheeses work well in this recipe?
- While mozzarella provides that classic stretchy pull, you can experiment with other meltable cheeses like Gruyère, fontina, provolone, or a mixture of cheeses. Adding a small amount of Parmesan to the mix gives an extra flavor boost.
- → How do I know when the bread is fully baked?
- The bread should be golden brown on top, and the internal temperature should reach 200°F/95°C when tested with a thermometer. If the top browns too quickly before the center is done, tent it loosely with foil to prevent burning.
- → How should I store leftovers and how long will they keep?
- Once completely cooled, store leftovers in an airtight container at room temperature for up to 2 days. Reheat individual portions in the microwave for 15-20 seconds or warm the entire loaf in a 300°F oven for 10 minutes. The tangzhong method helps the bread stay soft even when reheated.